Pages

Wednesday, June 8, 2011

How to Make a Green Screen

The green screen effect is a type of chroma key. The idea is to create a pure green background which is then replaced with whatever background image you want.
This tutorial shows you how to set up a green screen (cheaply if necessary) and how to use it in your video productions. The tutorial includes:
  • Planning the studio setting
  • Green screen material
  • Lighting the green screen
  • Incorporating green screen footage into your videos
  • More Tips
There are numerous variations on the standard green screen technique and you will need to develop your own system based on the resources you have available. Whatever you do, remember the two most important considerations:
  1. The colour and lighting of the green screen needs to be as even as possible.
  2. You can't have anything in the foreground (i.e. part of the the subjects) which is the same colour as the green screen.

Planning a Green Screen Studio

Before you begin any construction, it's a good idea to plan your studio layout and green screen size. There is nothing worse than building a green screen which ends up being not quite wide enough.
Set up your proposed studio area and camera(s). Go through every type of shot you could possibly want and measure the total required background area. Allow enough room to change your mind about framing or widen the shot more than you originally thought. Also, allow extra space to the sides of the screen to place lights.
Ideally there should be some space between the foreground subjects and the green screen — this makes lighting easier.
Plan your budget.

Green Screen Material

There is some debate over which materials are acceptable for use as a green screen. Many professionals will tell you that the colour must be just the right shade of green, or that the screen must be made of certain material. It is certainly true that some materials and colours are better, but in reality you can make an effective green screen from just about any smooth, green surface.
If you really want the best possible screen you should do an Internet search for green screen material. There are numerous websites which sell specialist material and with a little research you can find something to suit your studio. Be aware that professional green screen material can be quite expensive.
In the more likely event that you would like a cheap option to get started with, you will be glad to hear that it's not hard finding useable material. There are three main options:
  1. Use a solid material such as cardboard or wood, painted green.
  2. Use flexible or spongy material such as foam, spandex, etc. If you're going this way, you are probably better off to buy professional material.
  3. Use some sort of fabric. You can either buy green material or buy white material and paint/dye it green.

Fabric

Go to a good fabric store and look through the selection — you should be able to find at least several choices.
  • The material should not be too reflective — this tends to create lighter "hotspots".
  • Lighter, brighter green is better than dark green.
  • Material which is crease-resistant is very desirable. Wrinkles are the enemy and you will appreciate material which can be set up and moved without destroying the smoothness.
  • Heavy material is good for providing consistent colour, especially if there is any possibility of anything behind the screen showing through. However it can be prone to more creasing.
If you need to pack up the material for storage or moving, roll it rather than fold it — this helps reduce wrinkling. It's a good idea to use a cylindrical object with a diameter of at least 5-10cm (2-4") to roll the material onto, for example, the heavy cardboard cylinders used as the centre of newsprint rolls.
You may want to iron your material from time to time to keep wrinkles away. If you are going to paint or dye the material, make sure you will be able to iron it. Note than ironing a piece of material this large without creating new creases can be a challenge.
Hang the material in whatever manner suits your situation. For example, you could use thumbtacks or a shower rail attached to the wall. To make a mobile screen, use two stands (such as light stands or mic stands) and mount a rail between them. You could also make stands from clothing racks, hat stands, or any similar type of frame.

Solid Material

Cardboard or wood has the advantage of providing a nice consistent surface, free of wrinkles. The disadvantage is that it's more difficult to pack up and move.
Although you can use any light, bright green paint, it is better to use a tint designed for green screens. Do a search for "chroma key paint" to see some options.


Lighting a Green Screen

In case you're wondering, the green screen does require it's own lighting. It's highly unlikely that you would be able to use the screen with existing ambient light or the same light you use for the foreground subjects. As mentioned previously, you should plan your screen lights before you begin construction.
The key to lighting a green screen is consistency. The whole point is to create a single, consistent shade of colour across the entire screen.
You will need at least two lights, preferably more. The diagram below shows how you could light a green screen which is a few metres across, using a couple of 300-500w lights (one at each end) and a couple of 100-250w lights below pointing up.
Note: Diffusion filters are very handy when lighting green screens. Diffusion helps create more even lighting and reduce the impact of shadows.
Green Screen Lights
You will probably want to experiment with different combinations to get the most even lighting.
Once the screen is lit to your satisfaction, add the main lighting for the subjects. At this point you may find that shadows created by these new lights are cast on the screen. Adjust the light positions and filters until you get the best compromise.

Using Green Screen Footage

Once you have recorded your green screen footage you will obviously need to remove the green parts of the image and replace it with your own background. This is done through a process called chroma keying, which means selecting a colour and removing every instance of that colour in the image. Any image placed "behind" this image then becomes visible.
Greenscreen Keying
There are two common ways to create a chroma key:
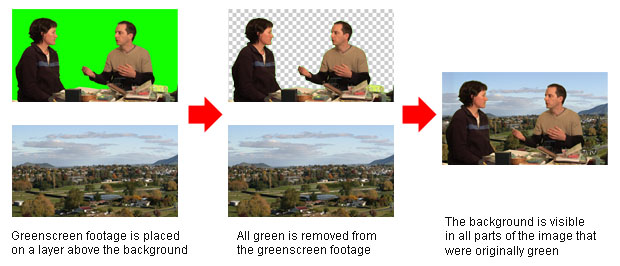
  1. In real time, using a video switcher or special effects generator.
  2. In post-production, using editing or compositing software.
Adobe Premiere Chroma Key EffectWe will assume that you are using the second method since this is by far the most common, especially for beginners. Exactly how you do a chroma key will depend on the editing software you use but the general process used by most applications goes like this:
  1. Place the green screen footage on a layer in the timeline.
  2. Place the footage or image to be used as the background on a layer below the green screen footage.
  3. Add a green screen or chroma key effect to the top layer (the example shown is the effect supplied with Adobe Premiere).
  4. Select green as the colour to use in the key. Most software provides a colour picker to help you do this.
  5. After selecting the colour, parts of the image will become transparent and you should see the background appear in these parts. Adjust various parameters to get the best effect.

Green Screen Tips

Some software packages provide dedicated green and blue screen effects which may require the screen to be a very specific colour. If these effects don't work, use the more general and forgiving chroma key effect.
In most studios there will be some variation in the screen colour, no matter how hard you try to make it consistent. When selecting the key colour, try to select a part of the screen which best represents the overall colour.
Key parameters to adjust include similarity and blending. Experiment with these to see how they work. You will almost always have to adjust these to get an acceptable effect.
Make sure anyone appearing in your video is aware that they cannot wear green (or blue if you're using a bluescreen). You also need to avoid green (or blue) props and other objects. Watch out for logos and symbols on people's clothing — these may be small enough that nobody notices them while shooting, but after adding the key they become horribly obvious holes in the person's body.
As well as avoiding green or blue, you will probably notice that some colours and shades work better than others. For example, dark coloured clothes may create more of a green rim around foreground objects than light colours. You should spend some time experimenting with lots of different colours.

Bluescreen/ Green Screen Compositing

There are many situations where placing an actor in a scene for real would be too
expensive, too dangerous, or even physically impossible. In these situations, you
would want to fi lm the talent in an inexpensive and safe environment, then later
composite them into the actual expensive, dangerous, or impossible background.
This is what bluescreen compositing is all about. The talent is fi lmed in front of a solid
blue background to make it easier for the computer to isolate and then composite
them into the actual background as shown in Figure.


Bluescreen compositing offers a completely different set of challenges than CGI
compositing, because the compositor must fi rst isolate the talent from the backing
color by creating a high-quality matte. This matte is then used to perform the composite,
whereas with CGI, a perfect matte is automatically generated by the computer
and comes with the CGI image.


The backing color can also be green, in which case it is called a greenscreen, but
the principle is the same in either case. The computer detects where the backing
color is in each frame and generates a matte that is used to composite the actor (or
spaceship, animal, dazzling new consumer product, or whatever) into the background.
This is where the artistic and technical challenges to the compositor skyrocket.
Not only because of the difficulty of creating a good matte, but also because
the various elements will not visually match the background very well so they must
be heavily color corrected and processed by the digital compositor to blend them
properly.

Green

 Green Screen Photos...


Match Move

Directors and cinematographers hate to lock off the camera. They love to swoop the
camera through the scene, boom it up over a crowd, or swing it around the heroic
character. This is fine if the shot is all live action, but it wreaks havoc if the shot
requires CGI to be mixed with the live action.
If the live-action camera is moving, then the CGI camera must also move so that the CGI will match the changing perspective of the live action. Not only must the CGI camera move, but it must move
in perfect sync with the live action camera or the CGI element will drift and squirm
in the frame and not appear to be locked with the rest of the shot. Special matchmove
programs are needed to pull off this bit of cinematic magic. An example of a
match-move shot is shown in Figure  where the camera orbits around the liveaction
soldier. The soldier is in an all CGI environment.

Match move is a two-step process.

First,
the live-action plate is analyzed by the match-move program. A plate is simply a shot that is intended to be composited with another shot. The match-move program correlates as many features as it can between
frames and tracks them over the length of the shot. This produces a 3D model of the terrain in the scene, as well as camera move data. The terrain model is low-detail and
incomplete, but it does provide enough information for the next step.

The second step is to give the 3D terrain information and the camera move data
to the 3D animators. They use the terrain information as a guide as to where to place
their 3D objects. The camera move data is used by the computer camera to match
the move of the live-action camera in order to render the 3D objects with a matching
perspective that changes over the length of the shot. If the terrain information
or camera move data is off in any important way, then the 3D objects will scoot and
squirm rather than appear to be fi rmly planted on the ground.


After all the 3D elements are rendered, the live-action plate and the CGI arrive
at the digital compositor for fi nal color correction and compositing. Of course, the
compositor is expected to fix any small (or large) lineup problems in the CGI or live
action. The match move game can be played in two fundamental ways: Live action
can be placed in a CGI environment, or CGI can be placed in a live-action environment, like King Kong in New York City. Either way you work it, match move is truly one of the great wonders of visual effects.

Sunday, June 5, 2011

Set Extension

If you wanted your actors to be seen standing in front of the Imperial Palace on the
planet Mungo, you may not want to spend the money to build the exterior of
the entire Imperial Palace.
      Better to build a small piece of it on a movie set, place the
talent in it, then extend the set later using CGI when you need a wide shot. For this
little piece of digital magic, the fi lm is digitized into the computer and the CGI folks
build a 3D model of the Imperial Palace and line it up with the original fi lm footage
and its camera angle.

There might even be a camera move in the live action that the
CGI artists will carefully track and match; but eventually, the live action and the CGI
set extension must be composited and color corrected to match perfectly.


Figure 1-2 is a classic example of a set extension that demonstrates how they can
even be applied to an exterior location shot. The original photography captures the
future soldier walking along an otherwise small and uninteresting rubble pit. The
middle picture shows the set extension element that was an all CGI city in the distance
with smoke generated by a particle system and a matte painting for the sky.
The resulting composite shows all of the elements composited together and color
corrected to blend properly.
You can immediately see the enormous difficulty in trying to create this shot
without using set extension and digital composting. You would need to fi nd a location that had the rubble pit the correct distance from a real city that had the right
look and was (unhappily) on fi re at the time. You would then have to wait for the
right time of day to get the sunset sky, and in location shooting, waiting is very
expensive. If such a location could even be found, you would then have to fl y the
entire crew out there. This amounts to a very expensive if not nearly impossible
production plan.


Instead, the producer wisely chose to do a set extension. The rubble pit was easy
to find and close at hand. The crew drove to the location in only half an hour. Once
the film was digitized, the CGI department took over and created the background
city and smoke animation, while the digital matte painter made the sky painting.
When all was ready, the digital compositor took all four elements: Original photography,
CGI set extension, smoke animation, and matte painting, and then composited
them together and then color-corrected them to blend naturally. Not only was
this far less expensive, but (and this is the punch line) the director got exactly the
shot he wanted. What CGI and digital compositing bring to the table is creative
control—the ability to make exactly the shot you want—not just what is practical
or affordable.

CGI Compositing

By far the most common application of digital compositing is to composite CGI.
Whether it is for a $100,000 commercial or for a $100 million dollar movie, the
CGI is created in a computer and composited over some kind of a background image.
The background image is very often live action, meaning it was shot on fi lm or video,
but it too could be CGI that was also created in a computer, or it may be a digital
matte painting. Regardless of where the background came from, the digital compositor
puts it all together and gives it the fi nal touch of photorealism. Figure illustrates


a basic CGI composite where the jet fighter was created in the computer, the
background is live action footage, and the fi nal composite puts the jet fi ghter into
the background.

Today, CGI goes far beyond jet fighters and dinosaurs. Recent advances in the
technology have made it possible to create a very wide range of incredibly realistic
synthetic objects for compositing. Beyond the obvious things such as cars, airplanes,
and rampaging beasts, CGI has mastered the ability to create photorealistic hair, skin,
cloth, clouds, fog, fi re, and even water. It has even become common practice to use
a “digital double” when you want the movie star to execute a daring stunt that is
beyond even the expert stunt double. It will not be long before the fi rst “cyber thespian”
(an all CGI character) stars in what would otherwise be a live action movie.
However, after all the spaceships, beasts, water, and fi re have been rendered, somebody
has to composite them all together. That somebody is the dauntless digital
compositor.

Visual Effects and Today

Digital compositing  is an essential part of visual
effects that are everywhere in the entertainment
industry today: In feature films, television commercials,
and many TV shows, and it’s growing. Even a
noneffects film will have visual effects.

It might be a
love story or a comedy, but there will always be
something that needs to be added or removed from the picture to tell the story.

That is the short description of what visual effects are all about—adding elements to a
picture that are not there, or removing something that you don’t want to be there.
Digital compositing plays a key role in all visual effects.

The elements that are added to the picture
can come from practically any source today. 

 We  might be adding an actor or a model from a piece
of fi lm or videotape or, perhaps the mission is to
add a spaceship or dinosaur that was created entirely
in a computer, so it is referred to as a computer
generated image (CGI). Maybe the element to be added is a matte painting done
in Adobe Photoshop®. The compositor might even create some of their own
elements.


It is the digital compositor who takes these
disparate elements, no matter how they were created,
and blends them together artistically into a seamless,
photorealistic whole. 

The digital compositor’s mission
is to make them appear as if they were all shot
together at the same time, under the same lights with
the same camera
, then give the shots a fi nal artistic
polish with superb color correction. This is a nontrivial accomplishment artistically,
and there are a variety of technical challenges that have to be met along the way.
Digital compositing is both a technical and an artistic challenge.

The compositor is first and foremost an artist, and works with other artists such as matte painters, colorists, CGI artists, and art directors as members of a visual effects team. This team must coordinate their efforts to produce technically sophisticated and artistically pleasing effects shots. The great irony here is that if we all do our jobs right, nobody can tell what we did because the visual effects blend seamlessly with the rest of the movie. If we don’t, the viewer is pulled out of the movie experience and begins thinking, “Hey, look at those cheesy effects!”


So what is the difference between visual effects
and special effects? Visual effects are the creation or
modification of images, where special effects are
things done on the set, which are then photographed
such as pyrotechnics or miniatures. In other words,
visual effects specifi cally manipulate images. Since
manipulating images is best done with a computer,
it is the tool of choice, and this is why the job is known as digital compositing.


I mentioned earlier that digital compositing is
growing. There are two primary reasons for this.
First is the steady increase in the use of CGI for
visual effects, and every CGI element needs to be
composited. The reason CGI is on the upswing is
because of the steady improvement in technology,
which means that CGI can solve more digital problems
every year, thus increasing the demand by movie-makers for ever more
spectacular effects for their movies (or TV shows
or television commercials).

Furthermore, as the
hardware gets cheaper and faster and the software
becomes more capable, it tends to lower the cost of
creating CGI. However, any theoretical cost savings
here are quickly overwhelmed by the insatiable appetite
for more spectacular, complex, and expensive
visual effects. In other words, the creative demands continuously expand to fi ll the
technology.

The second reason for the increase in digital
compositing is that the compositing software and
hardware technologies are also advancing on their
own track, separate from CGI. This means that
visual effects shots can be done faster, more costeffectively,
and with higher quality. There has also
been a general rise in the awareness of the fi lm-makers in what can be done with
digital compositing, which makes them more sophisticated users. As a result, they
demand ever more effects be done for their movies.

Reference:
Compositing Visual Effects
Essentials for the Aspiring Artist

Steve Wright